This is the continuation of the procedural Rain Shader. After finishing the static drops I of course needed some that run down vertical surfaces. Since the initial setup is very similar I will skip explaining some of the first steps and jump straight into the more exciting stuff.
I looked for some reference video clips and found this one. There are some things, like merging raindrops or the trails, which I won't be able to recreate, but it helps to give me a general idea of what I am looking to achieve.
Before going into explaining further steps, my current state of the Material Function looks like this.
The UVs are not quadratic anymore, I set it to a different ratio, so I have more vertical space for the drops to run down. I have generated random offset values for. Since the XY-Position will be animated the method for offsetting is a bit more complicated.
Basic setup
The next step I wanted to work on was having the drops move down. The easiest way of achieving this is by just using a panner of offsetting the UVs over time. This however makes the drops all move at a constant rate, which looks very unnatural, since rain drops usually move with varying speed due to surface properties, etc.
Triplanar Mapping with Panner
Since I cannot change the position of the UVs for each individual drop I need to change the Center position of the drop by using another function. This can counteract the UV panning so that the drop sometimes seemingly moves faster or slower. The easiest solution, even though not the most elegant, since it is still a very uniform funtion, is using sine. After setting it up it looks something like this:
Not quite what I was looking for. I am going to dive a bit more into the math behind it to explain how it works.
Let's assume we have a time frame of 1 second. We know that the UVs travel a distance equivalent to the speed. In a function it can be described as distance = time * speed, where speed is a constant.
f(t) = t at speed 1
To simplify things it would be great to fit one phase of the sine function into the range of 0-1. Fortunately Unreal is kind enough to have that built in (I should have researched that first, I spent a good time scratching my head about it). Otherwise it would be fairly easy to do manually, since we know that 1 phase of sine is 2π, so the function would have to look like this: f(x) = sin(x*2π).
So this is up to the point, that the video shows. The problem is, that the sine function covers a far greater distance in 1 second, 4 units to be exact, however we want it to be equal to the distance the UVs cover. So whe need to divide it by 4/ multiply by 0.25 to fix that. Also since the drop center can only be in the UV range from -.5 to .5 I further multiply the function by (.5 - drop radius) to prevent it from leaving that space.
The last thing to do is offsetting the time input and there we go. The graph below illustrates the Y-Position change of the drop center over time.
Drop Y-Coordinate progression
Setup in UE4
This is getting there. It'd probably better to use a function that is not as uniform as the Sine-Function, maybe a combination of them, but I decided to keep it simple for now and really understand, what is going on mathematically, before trying something more ambitious.
This basically covers the Y-Axis movement.
In a next step I wanted to create a mask for the trails a raindrop would leave on a foggy surface. The main problem here is, that I won't be able to have the raindrops leave behind trails that stay. I will have to add some static ones to have that effect.
I ended up utilizing the UVs again to create 3 masks to then combine into the final mask.
Trail Masks
Trail Masks MF
Combining them with the drops looks like this now. As I said the trails are not permanent, they fade out pretty quickly. I might add a control for how much trail appears behind the drop.
After finishing that part I wanted to go back to something easy again, so I added the same option of removing some of the drops as I did in the other Material Function.
This is how the Function looks at this point:
Overview 001
Obviously this is still very far from how I want it to look so in the next step I tackled giving the drops a kinda wiggly movement on the X-Axis. Since using sine-waves has worked before I decided to try and utilize them for this as well.
I tried out a few ways of combining sine waves at different frequencies.
f(x) = sin(2x) * sin(3x)
f(x) = sin(2x) + sin(3x)
I really liked the outcome of the second function, this method works well unless the difference in the frequencies is too high. With some small modifications, like changing the frequency for each drop by multiplying the frequency by the random value and remapping it to fit the X-Axis space of each cell I now had to somehow use it to make the drops wiggle and draw the trail.
What I did is using the green Y-Coordinates of the UVs (before they go into the panner node) and used that as the input for the sine-functions, which gave the following result:
X-Offset
The output of the marked multiply node goes into the x-position of the drop's center position, which makes the drop move, however the trail is still a straight line.
To do that I added the inverse(otherwise the trail and drop position are mirrored) of that to the panning UVs, masked out the red channel and getting the absolute values of that. I then use a smoothstep again to get the trails to the thickness of the rain drops.
And here is a clip of how all of that looks combined now.
This is starting to get closer to what I want this to look. I already know, that I will have to overlay a couple of those functions to create a more chaotic feeling.
Next I wanted to add some further distortion, utilising the same technique as with the other Rain Drop Material Function, using a normal map for that.
Distortion
What I want to point out is that I will definitely still have to do some tweaking of the Parameters and figure out how to improve some bits, but now with less than a month left for finishing the FMP I will have to accept, that some parts might not turn out the way I want them to turn out.
The last thing I did was creating the normal map for the drops. It is not accurate, however it will help distorting the other textures to give the feeling of refraction.
Overview
This kinda wraps up all that went into the two Rain Material Functions, I hope it was somewhat understandable. I put a lot of time into constructing them and learned a lot of new things, especially manipulating UVs to create procedural shapes. It was certainly a lot of fun.
Since I still have to combine them and implement them into the other Shaders I will show the finished results in a different blog post.
I spent the beginning of this week starting to redo the other Rain Material Function and made good progress, but again will explain it in a separate post. I also worked on and finished the Atlas Statue for the top of the Herald Building and made a Material for the upper floor windows of our buildings.
This is how our scene currently looks. We still have a long way to go in terms of lighting and atmosphere and time is running out. Might have to do an extra bit of pushing the next few weeks.
1 - Atlas Statue
Overall I spent about 2.5 days on this asset. I wish I could have polished it a bit more, but there are still so many tasks left to do I had to rush it a bit. Also, in all honesty, I have not really done any sculpting in a while, so I was a bit rusty.
It was quite difficult to make out any detail in the original concept.
Atlas Statue in the Concept
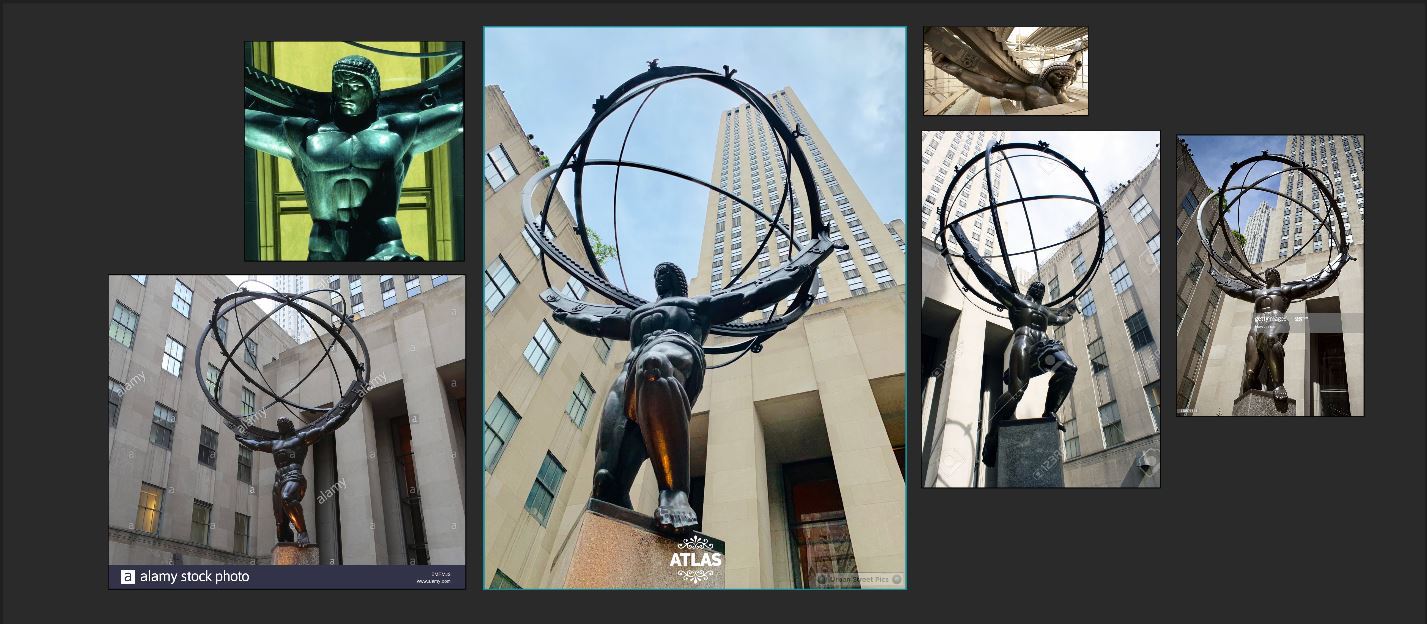
I did some research and found images of the Rockefeller Atlas statue, which fits our Art Deco theme so I took as the primary reference for my version. However we decided to keep the kneeling pose of the concept, since it made more sense composition wise.
Reference
ZBrush Sculpt
Retopo
Retopo
I feel like I could have saved a few more tris since the model is at about 7k tris, but I wanted to make sure that all the shapes are well defined.
For the textures I divided into 2 texture sheets, 1 for the body, 1 for the globe.
Globe Texture
Body Texture
I am quite happy with the result, considering the short amount of time I had to do it from start to finish. It certainly could have used a bit more polishing, but since you will only be able to see it from quite far away in the scene we'll hopefully get away with it. We are also still lacking the platform the atlas statue is standing on, that might be something I'll do next.
UPDATE: I made a quick placeholder platform and threw on some textures we already had. Litha might come up with a better version, we will see, but here is how the Atlas Statue looks in the level.
Now it is Atlas Square
2 - Interior Window Shader
Our Window Meshes are constructed in a way, that we have one plane for the glass and one for the interior, which I worked on this week as well.
Two functionalities which we agreed on from the beginning was, that we wanted the lights to turn on and off, as well as the blinds opening and closing in intervalls.
Fortunately Unreal has a Material Node called PerInstanceRandom, which can be utilized for that.
Interior Window Material Graph
The first thing I tackled was the opening and closing blinds. Litha made the textures for them. To move them up and down I just offset the UV Coordinates in the Y-Direction. However I needed to make sure, that the texture is not tiling, so I tried setting the Texture Tiling Mode to Clamp instead of Wrap, however that didn't work quite as intended, so I used a Custom Node to return a Mask of the UV 0 - 1 range. There are probably more elegant ways to solve this, for now this does the job.
I then multiplied the output of the custom node with the mask of the blinds to get the desired result.
The next part I had to worry about was the interior behind the blinds. Litha originally had suggested to just use emissive colors and see how that turns out.
I made a procedural vignette effect for that, however when just using that as the emissive it looked way to cartoony and flat, so I thought about alternative solutions. I also used the PerInstanceRandom Value to add slight color variation, lerping between the emissive colors and their negatives, in this case yellow and blue tones, which provided better results than using a HueShift instead.
Vignette
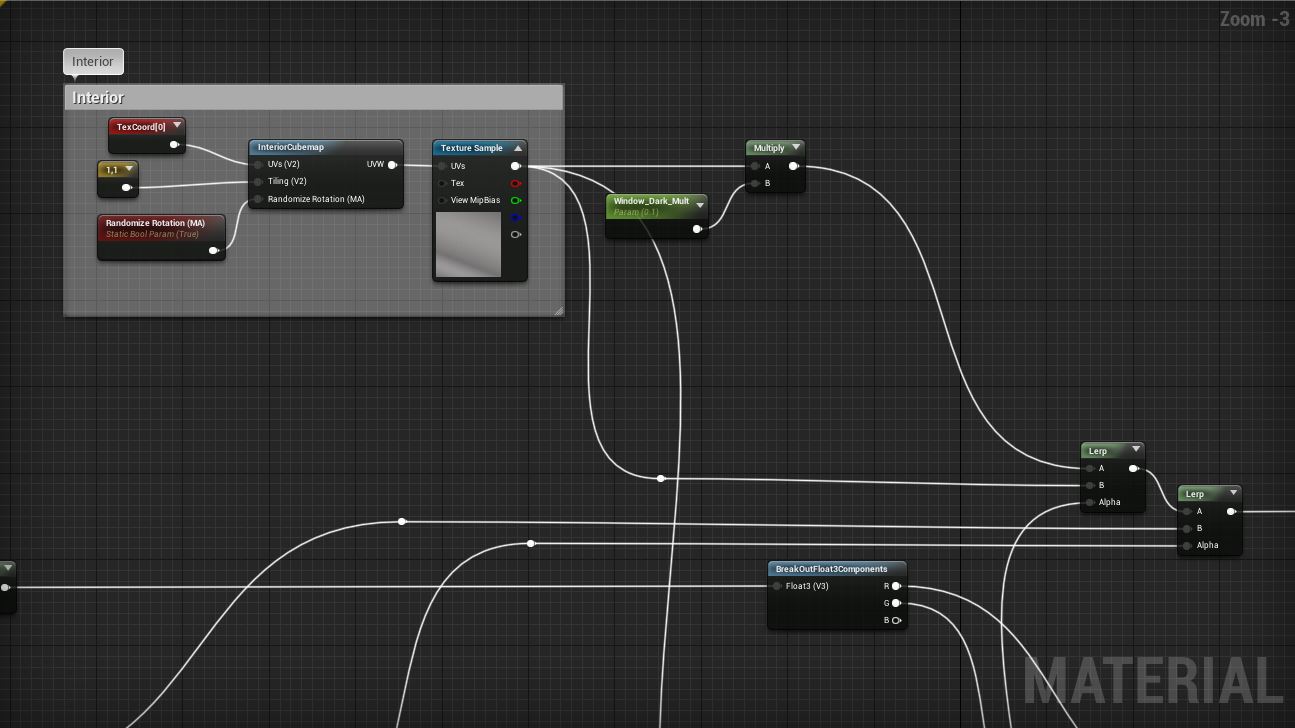
Originally we had hoped to ad parallax to the widows, but scrapped the idea, because we don't have enought time to make assets to populate the rooms. However it still seemed like the best option to me, so in order to test and simplify if I baked a cubemap of a cube interior. I made different versions for testing, two examples are below.
I went with a variant of the second one. I found out, that lower contrast and medium values worked better. This cubemap then could be used to create the sense of an interior as well as controlling the emissive strength. Of course it still looks a bit strange, so we might have to add some detail, but for now it still helps adding a lot to the overall scene.
Interior Cubemap in the Material Graph
I also used the Emissive Strength Parameter I added to lerp between a darker and lighter version of the cubemap, to increase the sense of lights turning on and of and not just saturation changes.
Next I moved on to animating the lights and blinds. I also wanted to be able to control which percentage of the windows would be animated and which static/turned off.
PerInstanceRandom Setup
I use the PerInstanceRandom value to the threshold/percentage value and return either 0 or the Random value. I then remap the values to the 0 - 1 range. This is very similar to what I did in the Rain Drop Function to even out the time offset.
Now I had to worry about how to transition between the on/off and open/closed states. The very obvious answer was to use a sine/cosine function, however I ideally want a function that isn't constantly changing, so I started looking for flattened sine/cosine functions and stumbled over this thread on StackExchange: https://math.stackexchange.com/questions/100655/cosine-esque-function-with-flat-peaks-and-valleys
I ended up using the following function, since it was simple and controllable in the way I wanted it to be.
I used this function to control the speed at which the state change happens and used different values for the lights and blinds, the blinds using a longer transition period. The Phase length is also controlable.
For the lights, if the PerInstanceRandom Value is below the treshold I return 0, so they are turned off by default, for the blinds I return the PerInstanceRandom Value.
All this combined looks like this in the level:
Material Cube
Now with the material added to the windows the scene is starting to feel slightly more alive (we will have to figure out some better settings), however we still have such a long way to go until it is even close to the concept in terms of atmosphere.
Next I will probably tackle the clouds/fog, finish the Rain Material Functions and start implementing the actual rain.
My original prototype used UV Coordinates, but I then decided to move it into World Space Coordinates to save us some trouble with adjusting UVs for all the different props.
So I basically used the approach for triplanar mapping to get the necessary UVs.
Triplanar Mapping
After putting the result of the triplanar into a frac node the it looks like this.
Each of the resulting squares will be the space for one raindrop. I then subtract 0.5 to bring it from a range of 0-1 to -.5 - .5 and use a spheremask to create the drop shape. That way I can later also use the UVs to create a normal map
Triplanar Mapped UVs
Remapped UVs
Squares for Drops
Centered Drops
Obviously this doesn't really look anything like rain, yet. The drops need to appear and then fade out at different times, so somehow I need a random value in the range of 0 - 1 for each of the squares to offset time. I remembered a shader tutorial I watched a while back, where a hash function was used to generate those values taking the uv input and based on those putting out a value in the 0 - 1 range.
I ended up finding this Shadertoy Shader ( https://www.shadertoy.com/view/4djSRW ) by Dave_Hoskins, which demonstrated a range of hash functions. The one I needed was the hash12 function(1 output, 2 inputs ), so I recreated it in UE4 experimenting with different values.
Hash12 Function
So I put the UVs through a Floor node to get one consistent value for each square and then into the hash function. However I got some strange patterns (gradients) in some areas. After some experimentation I found out that when inverting the values and putting them through another hash it resolved those issues.
First Hash - Weird patterns on the left side
Second Hash - Slightly better distribution
Treshold
Now having that I could fade out the drops. I basically took Time,
multiplied it with a Scalar Parameter to control the fade out speed and
the put that through a Frac, again to loop between 0 and 1. I can then
use the result of that and multiply it with the drop shapes to make them
appear and fade out.
Obviously this still has a long way to go, so the next thing I needed to do was offsetting the drops, so that they are not all in the center. I can use the random numbers, but need to find a way to get them in the -.5 to -5 range for both X and Y direction. I had the idea of using sine and cosine to accomplish that and getting different values for X and Y. Combining that with a change every them the time frac loop starts again makes the drops look a lot more organic.
The way that works is taking the time offset by the random value and putting that through a floor, so the value changes at the same time as the drop appears. I then multiply that time value with the original random number, feed that into a sine and a cosine node and then append them. However this is still in the -1 to 1 range and it has to be in the (-.5 + drop radius) to (.5 - drop radius) range, so I multiply it by .5 - drop radius. This ensures the drop is alwas fully within the square.
Random offset value
This can be then added to the UVs that go into the SphereMask node, which then offsets the drop position. The result of that looks like this:
Offset with slightly bigger drop radius
Next I wanted to add control over how many of the drops actually 'spawn'/show up, so I added a threshold value.
The way that works is comparing the random value with the threshold value. If it's below return 1, else return 0. I then multiply the mask by that output to mask out the drops that are not supposed to be drawn.
However a big problem is, that the time offsets are still in the range 0 - threshold, which causes some weird pauses, see the beginning of the following video. The solution to that is remapping that offset range to 0 - 1. Here is the graph and the video showing the result of adding that threshold.
I am pretty happy with the outcome so far, however the drops still look way to regular, so I needed to add some distortion to them. I decided to use a texture for that and for testing turned some perlin noise into a normal map. Same as changing the drop position I offset the normal texture every loop, which might not be necessary, but might help with some more variation.
The last thing I did was creating a normal map, using the distorted UVs, which ended up looking like this. The Normal Map of the drops can later be used to create the illusion of refraction, by distorting for example the underlying Albedo Map, etc.
Normal Map
And that is basically everything that is to the Rain Drop Shader Part 1. I will describe how I created the dripping rain in another post.