

This is how our scene currently looks. We still have a long way to go in terms of lighting and atmosphere and time is running out. Might have to do an extra bit of pushing the next few weeks.
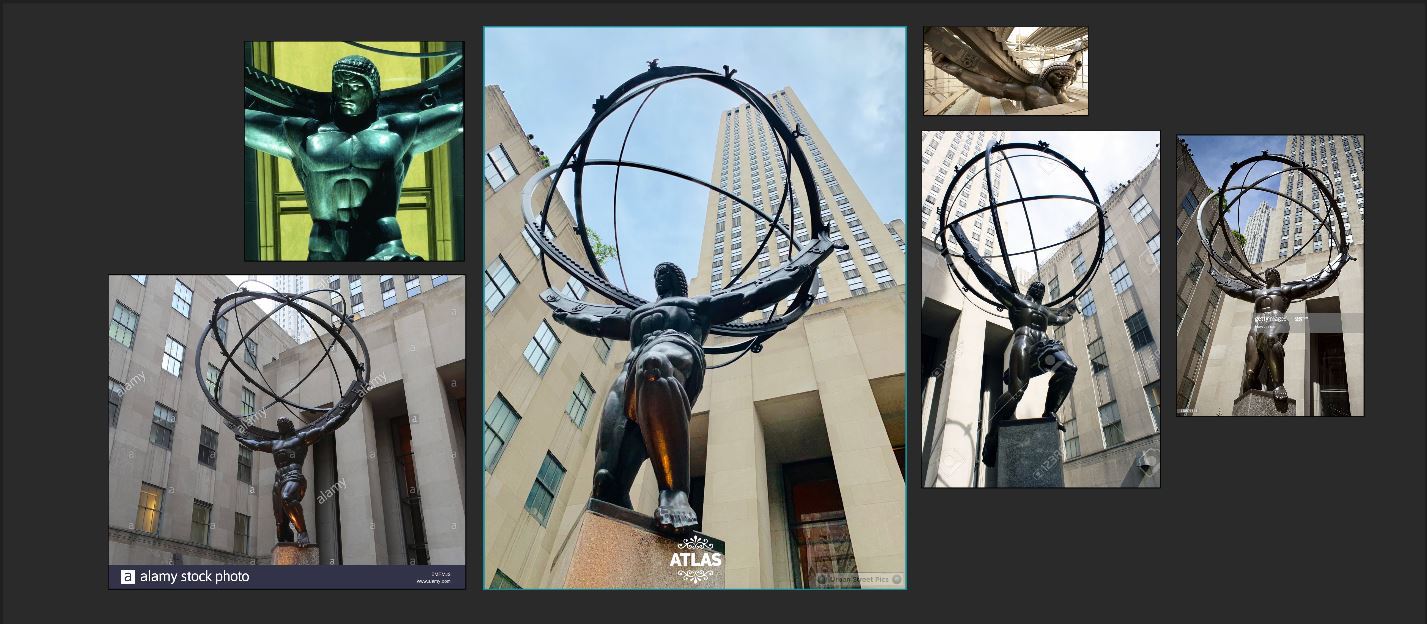
1 - Atlas Statue
Overall I spent about 2.5 days on this asset. I wish I could have polished it a bit more, but there are still so many tasks left to do I had to rush it a bit. Also, in all honesty, I have not really done any sculpting in a while, so I was a bit rusty.It was quite difficult to make out any detail in the original concept.
 | |
| Atlas Statue in the Concept |
 |
| Reference |
 | |
| ZBrush Sculpt |
 | |
| Retopo |
 | |
| Retopo |
I feel like I could have saved a few more tris since the model is at about 7k tris, but I wanted to make sure that all the shapes are well defined.
For the textures I divided into 2 texture sheets, 1 for the body, 1 for the globe.
 | |
| Globe Texture |
 | |
| Body Texture |
UPDATE: I made a quick placeholder platform and threw on some textures we already had. Litha might come up with a better version, we will see, but here is how the Atlas Statue looks in the level.
 | |
| Now it is Atlas Square |
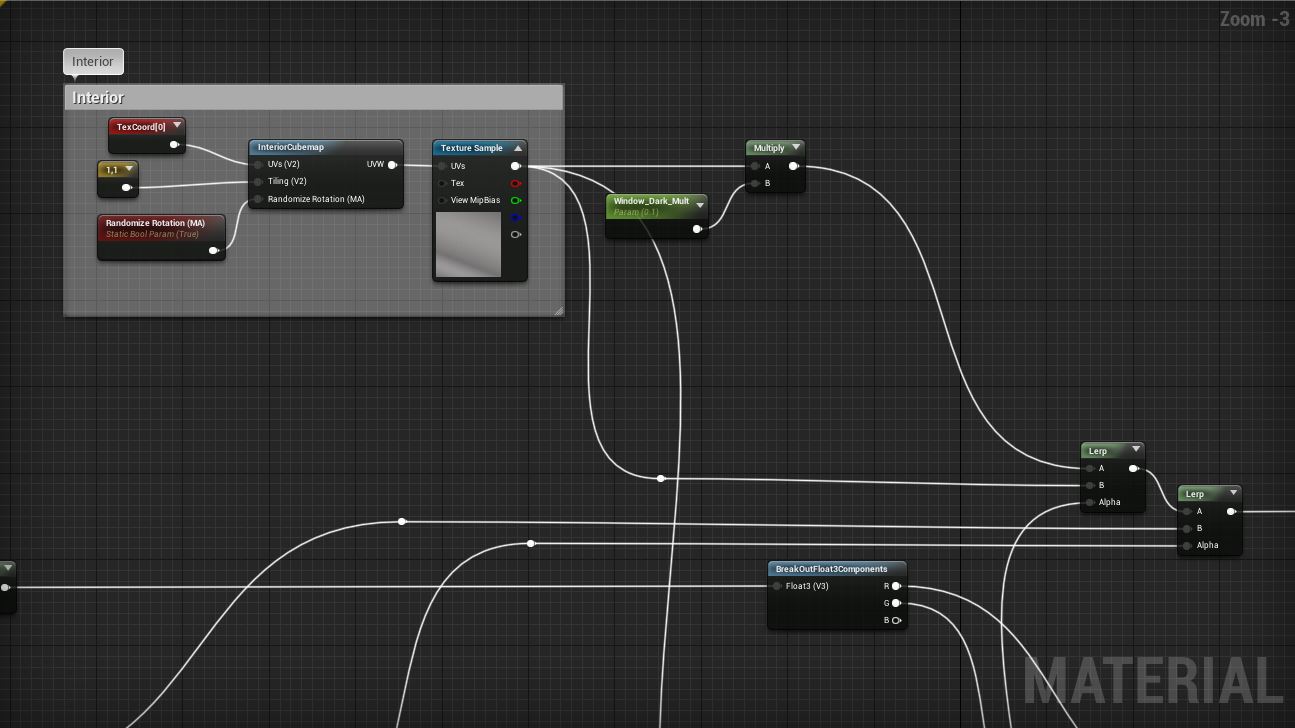
2 - Interior Window Shader
Our Window Meshes are constructed in a way, that we have one plane for the glass and one for the interior, which I worked on this week as well.Two functionalities which we agreed on from the beginning was, that we wanted the lights to turn on and off, as well as the blinds opening and closing in intervalls.
Fortunately Unreal has a Material Node called PerInstanceRandom, which can be utilized for that.
 |
| Interior Window Material Graph |
I then multiplied the output of the custom node with the mask of the blinds to get the desired result.
The next part I had to worry about was the interior behind the blinds. Litha originally had suggested to just use emissive colors and see how that turns out.
I made a procedural vignette effect for that, however when just using that as the emissive it looked way to cartoony and flat, so I thought about alternative solutions. I also used the PerInstanceRandom Value to add slight color variation, lerping between the emissive colors and their negatives, in this case yellow and blue tones, which provided better results than using a HueShift instead.
 | |
| Vignette |


I went with a variant of the second one. I found out, that lower contrast and medium values worked better. This cubemap then could be used to create the sense of an interior as well as controlling the emissive strength. Of course it still looks a bit strange, so we might have to add some detail, but for now it still helps adding a lot to the overall scene.
 |
| Interior Cubemap in the Material Graph |
Next I moved on to animating the lights and blinds. I also wanted to be able to control which percentage of the windows would be animated and which static/turned off.
 |
| PerInstanceRandom Setup |
Now I had to worry about how to transition between the on/off and open/closed states. The very obvious answer was to use a sine/cosine function, however I ideally want a function that isn't constantly changing, so I started looking for flattened sine/cosine functions and stumbled over this thread on StackExchange: https://math.stackexchange.com/questions/100655/cosine-esque-function-with-flat-peaks-and-valleys
I ended up using the following function, since it was simple and controllable in the way I wanted it to be.


I used this function to control the speed at which the state change happens and used different values for the lights and blinds, the blinds using a longer transition period. The Phase length is also controlable.
For the lights, if the PerInstanceRandom Value is below the treshold I return 0, so they are turned off by default, for the blinds I return the PerInstanceRandom Value.
All this combined looks like this in the level:
 | |
| Material Cube |
Now with the material added to the windows the scene is starting to feel slightly more alive (we will have to figure out some better settings), however we still have such a long way to go until it is even close to the concept in terms of atmosphere.
Next I will probably tackle the clouds/fog, finish the Rain Material Functions and start implementing the actual rain.
No comments:
Post a Comment